

Tour of RTIR

News and Views from the Makers of Request Tracker
RT 4 adds many options you can put in your etc/RT_SiteConfig.pm totweak the way your RT looks and behaves for your users, as well as how RT works behind the scenes. Some of the new options are also available as individual user preferences by going to the Logged in as … → Settings → Options page.
In this blog post, we'll provide an overview of most of the new options.
These options are discussed in our blog post on autocompletion.
Enable this to redirect to the created ticket display page automatically when using QuickCreate.
These options affect the "More about requestors" box on the ticket display page and will be discussed in a separate upcoming blog post about customizing the displayed requestor information. (If you're eager to customize this, read the sections in etc/RT_Config.pm.)
This determines if the "More about requestors" box on the ticket display page shows information about privileged users. By default it only shows information about unprivileged users.
By default, the simple search in the upper right corner only searches active tickets. If you want to search for a specific status, you can include the status in your search. If you want to search all ticekts regardless of status, disable this option.
When only one ticket is found in search, use this to redirect to the ticket display page automatically. Disabled by default.
Display a simple list of who will receive any kind of mail on the ticket reply page, instead of a detailed breakdown by scrip. Disabled by default.

Remembers the last queue you created a ticket in using the "New ticket in" button and queue list at the top of the page. If you haven't created a ticket in your current session, the Default Queue preference is used. Disabled by default.
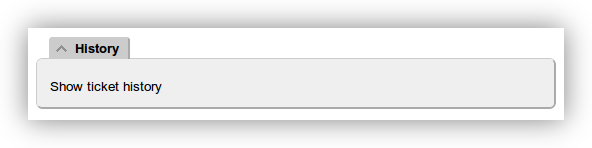
When set to 1, the ticket display page will omit the ticket history until a link is clicked to load and display the history. This can be useful if you routinely browse long-running tickets but don't need to always read the history. Disabled by default.
Display the ticket create and update pages using two columns on screens that are wide enough. The new two column pages are much more effective at making more information visible on a single page, especially with many custom fields. Enabled by default.
Enable this option to display the Articles search and selection interface on the Ticket Create page in addition to the Reply/Comment page.
Enable this option to hide the search and include boxes from the Article UI. This assumes you have enabled the Article Hotlist feature on at least one of your Classes, otherwise you will have no access to Articles. This option does not hide the Articles link in the Tools menu.
The available flags under %FullTextSearch are discussed in our blog post on fast full-text searching in RT.
Lifecycles are a powerful way to describe custom workflows for your tickets on a per-queue basis. We'll be covering them in depth in an upcoming blog post. If you're feeling adventurous and would like to dive in early, there is a decent amount of documentation in the Lifecycles section of perldoc etc/RT_Config.pm.
Files in this list will be included in the CSS (squished and unsquished) that RT serves. Recommended if you want local CSS changes that apply to all themes. Alternatively, you can use the advanced section of the Theme editor if you don't need a file on disk.
If set to 0, framekiller javascript will be disabled and the X-Frame-Options: DENY header will be suppressed from all responses. This disables RT's clickjacking protection. It is highly recommended you leave this option set to 1 unless you are embedding RT in an iframe from a different domain.
A handful of options were removed in 4.0, because they were made obsolete by new features or we added a better way to change the behaviour. The most used options that are unsupported in 4.0:
The first three of these options affect what is now controlled by lifecycles. By defining your own lifecycle or modifying the default, you can reapply the functionality. The last option, $SuppressAutoOpenOnUpdate, can be customized by modifying the stock scrip On Correspond Open Tickets that ships with RT.
All the options RT supports are documented in etc/RT_SiteConfig.pm, along with their defaults. To set any of them to a different value for your installation, add the appropriate Set( $OptionName, 'value' ); line to your etc/RT_SiteConfig.pm, clear the mason cache, and restart your webserver. Be sure to only have one Set(...) line for each option, otherwise only the first one will take affect.
RT is commonly used to manage a lot of data. Unfortunately, prior toRT 4, it didn't support effective indexing of the content of comments or correspondence. RT 4 makes use of the full-text indexing capabilities of PostgreSQL and Oracle, or the external Sphinx library for MySQL, to efficiently index this content, allowing for high-speed searching of textual content. Due to bugs in version 4.0.0, you'll need version 4.0.1 or higher to take advantage of the full-text indexing detailed below.
By default, with no full-text indexes enabled, RT 4 does not allow
searching of the "Content" field at all, owing to how resource-intensive
unindexed full-text searches are. If you wish to enable non-indexed
full-text searching, like previous versions of RT allowed, you will need
to add the following to your RT_SiteConfig.pm:
Set(%FullTextSearch,
Enable  => 1,
Indexed => 0,
);
The real magic comes from enabling your database's full-text indexes, however. For the section below, we'll be showing the configuration for PostgreSQL; we'll briefly address MySQL, which is slightly more complicated, at the end of this post.
If you intend to enable full-text indexed searches, you should also read
the docs/full_text_indexing.pod file which shipped with your RT
install, which will provide roughly the same information as below, but
is additionally guaranteed to be up-to-date with your version of RT.
To start off with, you'll need to configure your database to store the
index. On PostgreSQL, this consists of adding a new column and creating
an index on it. To do this, run rt-setup-fulltext-index:
$ /opt/rt4/sbin/rt-setup-fulltext-index
Enter the name of a DB table that will be used to store the Pg tsvector.
You may either use the existing Attachments table, or create a new
table.
[Attachments]:
Enter the name of a column that will be used to store the Pg tsvector:
[ContentIndex]:
Generally, you'll want to store the new column in the Attachments table, right next to the data it is indexing. If you want to back up the index separately, or have other storage constraints, you may wish to create a new table to store it, but the default is almost certainly correct. Similarly, the default column name is also most likely correct.
You may choose between GiST or GIN indexes; the former is several times
slower to search, but takes less space on disk and is faster to update.
[GiST]:
You can read more about the differences between the index types in the PostgreSQL manual.
Going to run the following in the DB:
ALTER TABLE Attachments ADD COLUMN ContentIndex tsvector
Going to run the following in the DB:
CREATE INDEX ContentIndex_idx ON Attachments USING gist(ContentIndex)
You can now configure RT to use the newly-created full-text index by
adding the following to your RT_SiteConfig.pm:
Set( %FullTextSearch,
Enable     => 1,
Indexed    => 1,
Column     => 'ContentIndex',
Table      => 'Attachments',
);
At this point, your database has been configured. Ensure that you add
the Set(...) block that rt-setup-fulltext-index output (which may be
different from the above!) to your RT_SiteConfig.pm before continuing.
Your index now exists, but is empty. In order to fill it, we must find
and index every textual attachment in RT using rt-fulltext-indexer
--all. This can be a very time-consuming task, so be prepared for it
to take a while. It can be interrupted and resumed safely, however.
Once it has finished, you will need to schedule rt-fulltext-indexer to
run at regular intervals to pick up new additions to the database. This
is easiest done by running ln -s /opt/rt4/sbin/rt-fulltext-indexer
/etc/cron.hourly, which will ensure that it runs once an hour, but many
other alternatives are possible. Depending on how fast tickets are
created in your system, running it as frequently as once every two to
five minutes may be possible.
The story on MySQL is unfortunately considerably more complicated, as
MySQL does not natively support a full-text index format. It integrates
with the external Sphinx search library, but
this requires recompiling MySQL to include the SphinxSE engine which
allows MySQL queries to retrieve data from the Sphinx searchd indexer.
While many vendors package the external Sphinx tools, none of them ships
a MySQL package which has been compiled with SphinxSE at the time of
writing. As such, this is most likely not for the faint of heart, or
those only just getting their feet wet with system administration.
Despite that, the process of recompiling MySQL with SphinxSE is fairly straightforward. Full instructions are provided in the Sphinx documentation. Sphinx 2.0.1 has been tested to work with both MySQL 5.0 and 5.1; it is not compatible with MySQL 5.5 at this time.
Once a SphinxSE-enabled MySQL has been installed, the configuration
proceeds roughly as for PostgreSQL, above. First, you must run
rt-setup-fulltext-index, which will ensure that your MySQL is
correctly configured with SphinxSE, then prompt you for additional
information:
$ /opt/rt4/sbin/rt-setup-fulltext-index
Enter name of a new MySQL table that will be used to connect to the
Sphinx server:
[AttachmentsIndex]:
Enter URL of the sphinx search server; this should be of the form
sphinx://<server>:<port>/<index name>
[sphinx://localhost:3312/rt]:
In order to communicate with the Sphinx searchd server, we create a
virtual SphinxSE table in the database. This table hence needs to know
where your Sphinx searchd server is running. The default is usually
correct if you are planning to run searchd on your database server on
the default port.
Maximum number of matches to return; this is the maximum number of
attachment records returned by the search, not the maximum number
of tickets.  Both your RT_SiteConfig.pm and your sphinx.conf must
agree on this value.  Larger values cause your Sphinx server to
consume more memory and CPU time per query.
[10000]:
This is an unfortunate limitation imposed by the design of Sphinx; 10000
should be sufficient for most purposes, but you may need to increment
this number if you have tickets with an extremely large number of
transactions which match your common search criteria. If you wish to
change this number later, you must alter it in both RT_SiteConfig.pm
and sphinx.conf files.
Going to run the following in the DB:
CREATE TABLE AttachmentsIndex (
id     INTEGER UNSIGNED NOT NULL,
weight INTEGER NOT NULL,
query  VARCHAR(3072) NOT NULL,
INDEX(query)
) ENGINE=SPHINX CONNECTION="sphinx://localhost:3312/rt" CHARACTER SET utf8
You can now configure RT to use the newly-created full-text index by
adding the following to your RT_SiteConfig.pm:
Set( %FullTextSearch,
Enable     => 1,
Indexed    => 1,
Table      => 'AttachmentsIndex',
MaxMatches => '10000',
);
It will also output a sample sphinx.conf file. At this point, your
database has been configured. Ensure that you add the Set(...) block
that rt-setup-fulltext-index output (which may be different from the
above!) to your RT_SiteConfig.pm before continuing.
Your index now exists, but is empty. In order to fill it, we must run the Sphinx indexer:
$ indexer rt
Sphinx 2.0.1-beta (r2792)
Copyright (c) 2001-2011, Andrew Aksyonoff
Copyright (c) 2008-2011, Sphinx Technologies Inc (http://sphinxsearch.com)
using config file '/etc/sphinx.conf'...
indexing index 'rt'...
collected 133809 docs, 1015.6 MB
sorted 137.2 Mhits, 100.0% done
total 133809 docs, 1015645236 bytes
total 144.967 sec, 7006036 bytes/sec, 923.02 docs/sec
total 400 reads, 6.474 sec, 637.6 kb/call avg, 16.1 msec/call avg
total 582 writes, 2.473 sec, 959.3 kb/call avg, 4.2 msec/call avg
Finally, you will need to start the searchd daemon:
$ searchd
Sphinx 2.0.1-beta (r2792)
Copyright (c) 2001-2011, Andrew Aksyonoff
Copyright (c) 2008-2011, Sphinx Technologies Inc (http://sphinxsearch.com)
using config file '/etc/sphinx.conf'...
listening on all interfaces, port=3312
precaching index 'rt'
precached 1 indexes in 0.033 sec
You will need to re-index the data using indexer --rotate rt at
regular intervals. Since Sphinx does not do incremental indexing, but
rather re-indexes all content each time it is run, a "main+delta"
split of the
data may be necessary to reduce index update time sufficiently to allow
close to real-time indexing.
As a ticket grows long in the tooth, correspondence which quotes the entire history of the conversation can balloon to become extremely large and unwieldy. It can be taxing just to find the new content of incoming email amidst all its history.
RT 4.0 makes this more manageable by folding away quoted content during ticket display. This lets you focus on what's important: the new text. When you do need to see the quoted text, it's still there, hidden behind a click. Now when you look at a ticket, you won't have to mentally skim over quoted lines or paragraphs. Quote folding makes reading a ticket's correspondence and history far more comfortable.

When you expand those folded-away quotes by clicking "Show folded text", you'll see that RT 4.0 now also colors nested quotes differently, so you can easily distinguish who wrote which text. The nesting level of each quote becomes more apparent when colored. Let RT count the angle brackets for you.
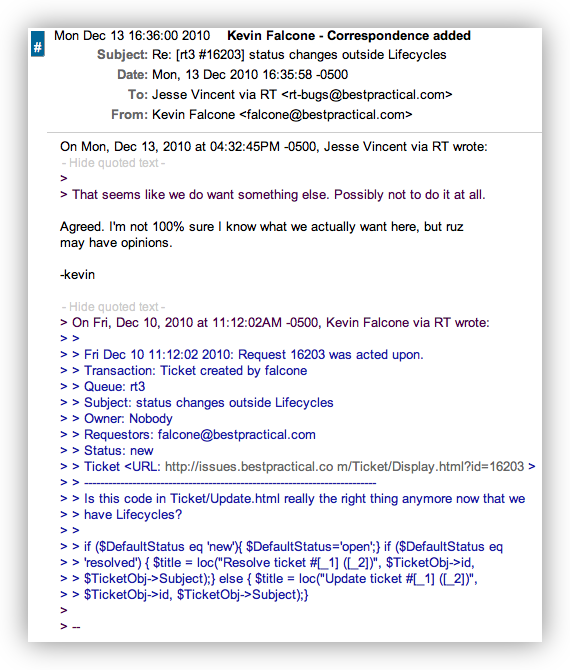
Our quote folding is robust enough to understand various quoting disciplines, whether it be top-posting, interleaved, or bottom-posting. You also don't have to stick with > to indicate quotations; RT recognizes many other kinds of quote markers.
Along with quote folding, we've improved how RT 4 displays HTML content in ticket history. One way that a lot of people quote text is by coloring the original text or the new content in their response. To facilitate such quoting, RT 3.8.2 and later display colors specified in HTML mail. RT 4.0 improves our HTML mail handling further. RT 4 understands more ways that mail client generates text styling, especially Microsoft Outlook. We also permit more kinds of styling, such as font-family and font-size.
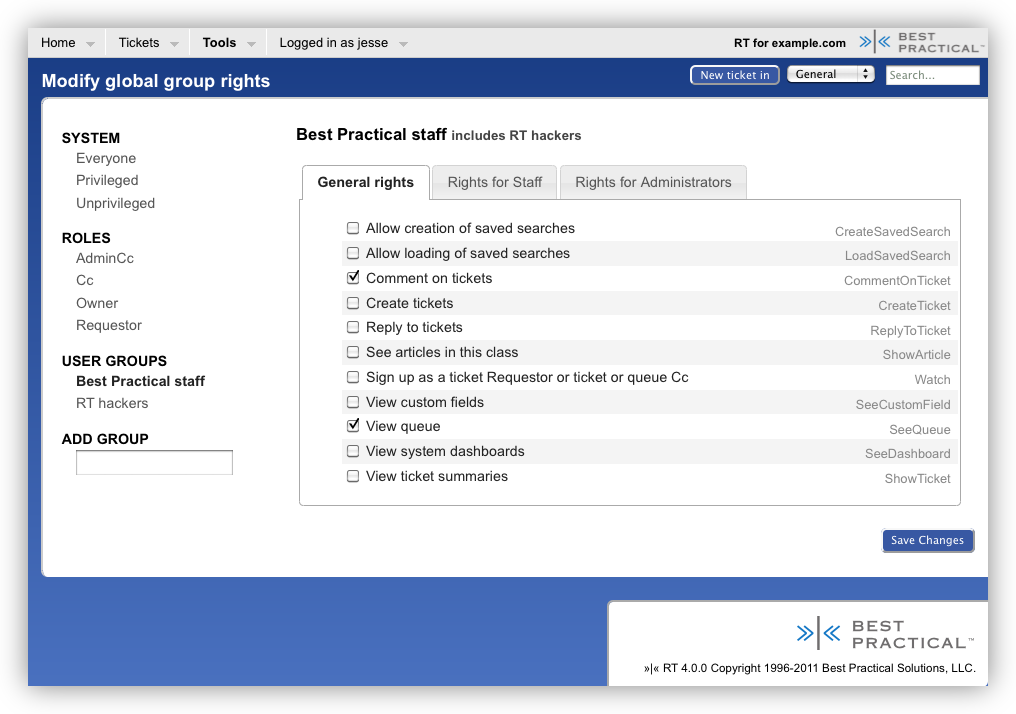
We completely revamped the user and group rights editor for RT 4. The new editor features a number of usability improvements:
If the group already has rights granted to it, simply click on the group name, click the rights you want to add, and Save Changes.
If the group doesn't have existing rights, begin typing its name into the Add Group field, and a list of autocompleted options will pop up. Choose the group you're looking for and then click on the rights you want to add, saving changes when you're done.
Uncheck every right from the user/group and click Save Changes. You should see a number of Right Revoked status messages (one for each right previously granted), and the user/group shouldn't appear in the left hand list. If they still appear, then you likely missed a right and should check again.
In the past, RT's requestor, Cc, and other user fields were just plaintext boxes that accepted email addresses or usernames. It was easy to typo an address or misspell a username and end up with not quite the ticket you wanted. Often making matters worse, the Owner field was limited to a dropdown. This worked fine for sites with a small number of possible owners, but it fell down quickly with more than a few dozen potential owners.
RT 4 solves the problems above by introducing built-in autocompletion for requestors, owners, Ccs, and AdminCcs. Out of the box, requestors and the other user fields now autocomplete as you type. The owner list remains a dropdown by default, but you can easily enable owner autocompletion by changing your preferences. You may prefer to enable it site-wide by adding Set($AutocompleteOwners, 1); to your RT_SiteConfig.pm file.
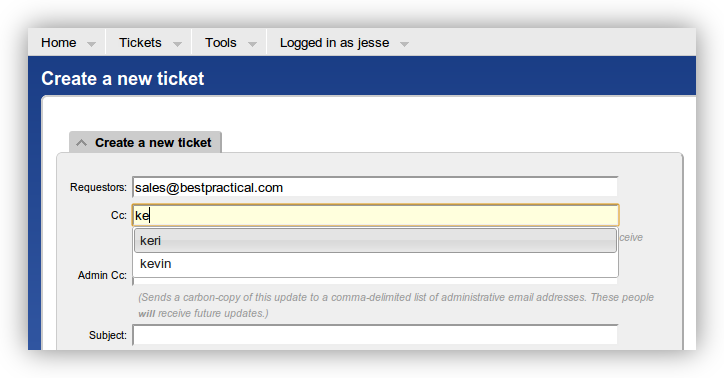
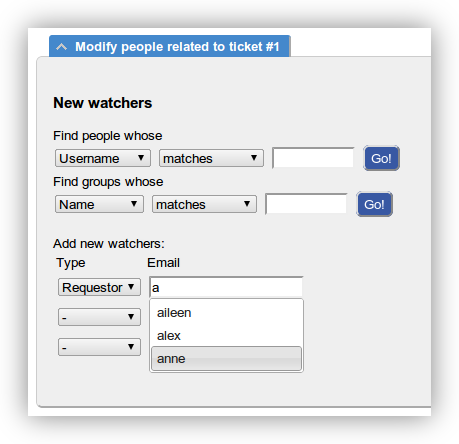
An autocompletion box should pop up for any field that accepts a username or email address. This includes the ticket create, update, jumbo, and people pages. Adding a requestor to a ticket is now much quicker, for example. Just go to the People page and start typing the email address, username, or real name of the new requestor in the input box under Add New Watchers. Select the user from the autocomplete, change Type to Requestor and click Save Changes. The old style find people form still works as usual, of course.
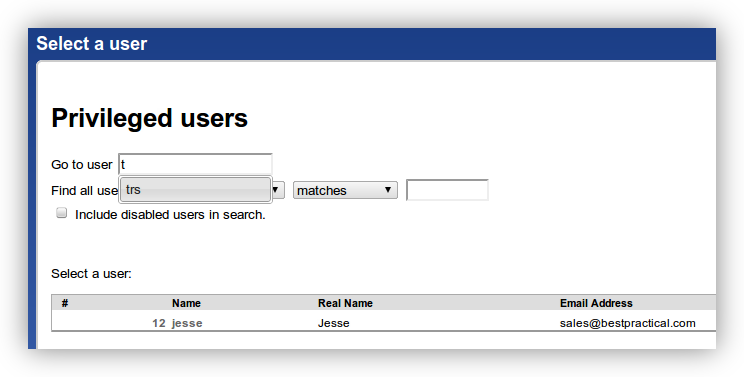
The user administration page in RT 4 sports a "Go to user" input box at the top that autocompletes against all the users in the system. If you have a long list of privileged users, or you're looking for an unprivileged one, it's now a breeze to jump to their record.
Out of the box, user autocomplete matches against the beginning of email addresses, usernames, and any part of real names. This should suit most organizations well, but don't fear if it doesn't work for yours, there's an easy way to change it!
Perhaps there are a lot of people named Joe in your company and you want to match on RT's nickname field as well. Adding this bit to your RT_SiteConfig.pm would do the trick:
# See more valid options here by running: perldoc /opt/rt4/etc/RT_Config.pm Set($UserAutocompleteFields, { # Keep the defaults EmailAddress => 'STARTSWITH', Name => 'STARTSWITH', RealName => 'LIKE', # Add the NickName field -- too many Joes! NickName => 'LIKE', });
Or perhaps a help desk wants to pick users by phone number when adding requestors.
Set($UserAutocompleteFields, { # Keep the defaults EmailAddress => 'STARTSWITH', Name => 'STARTSWITH', RealName => 'LIKE', # Useful for fielding support phone calls WorkPhone => 'STARTSWITH', });
With that in place, your staff will be able to add requestors by phone number in RT.
Out of the box, RT supports many custom field types. Beyond the simple "type in a value" and "select a value from this list", RT's custom fields can be images, wikitext, multiple attachments, and more. This variety in custom field types goes a long way towards helping organizations achieve the exact workflow they need.
In RT 4.0, we add two new types to this list: Date/DateTime and IP Address custom fields. We also add new display types for select-value custom fields: dropdown, radio list, and checklist.
RT has several DateTime fields built into its core, including Due, Starts, Resolved, etc.
When you edit such DateTime fields, RT pops up a calendar and a time selector so you can quickly click a date and time instead of typing them. But if you do type in a value, we're smart about parsing people-friendly date formats. Type in "next Monday" and we'll convert that into RT's timestamp format for you. RT's search engine also has logic for dates so that you can search for them in a natural way. If you use the search builder to construct a Resolved = '2011-03-21' (or Resolved = 'yesterday') clause, we rewrite that internally to (Resolved >= '2011-03-21 00:00:00' AND Resolved <= '2011-03-21 23:59:59') since that's the logic you want. Finally, users can configure the format that RT displays DateTime fields to them. While I personally like 2011-03-21 20:00:35, someone else may want Mon, 21 Mar 2011 20:00:35 GMT.
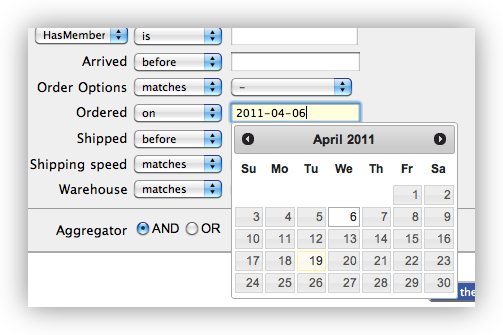
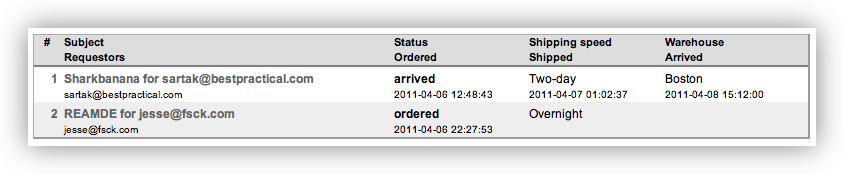
In RT 4.0, your business-specific custom fields can enjoy these features too! For example, you can use a DateTime custom field to track when your customer's package left your warehouse, then later search for tickets within a particular shipment window. Many sites are using the "type in a value" custom field type for dates. When you upgrade to RT 4.0, you'll be able to upgrade those custom fields to get better (and consistent) searching, entry, and display. When someone types "next Monday" into a DateTime custom field, you'll actually be able to find that ticket again.
RT 4.0 also adds date-only custom fields, for when you don't need to-the-second granularity. You still get all the benefits of a consistent format, user-specific display preferences, and intelligent searching and input.
RT for Incident Response, our computer security response system built on RT, has had support for IP address custom fields since its inception. We want to share that bit of RTIR with the greater RT community, so we've factored IP address custom fields into the core.
RT's IP address custom fields include support for IPv4 and IPv6, as well as IP address ranges (in CIDR format or simply 192.168.1.0-192.168.1.255). You can search for tickets with IP addresses in a particular range, using either the CIDR format or the regular range format.
We also validate what you type into IP address custom fields are actually possible IP addresses.
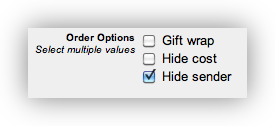
RT has always used a listbox widget for editing select-one and select-many custom fields. With RT 4.0, we've added an oft-requested feature: dropdown and radio lists for select-one custom fields, and checkboxes for select-many custom fields.
Dropdown custom fields are compact and are consistent with the rest of the select-one fields in RT. Dropdowns also have great support from many mobile web browsers.

Radio lists let you see every option at once. It takes only a single click to select a value.
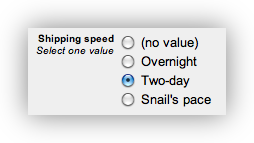
Whether you use a dropdown or radio button list is up to you; it probably depends on how many values the custom field can have. If there are a lot of values, a radio list is unwieldy.
Select many custom fields also have a new display type: checkboxes.
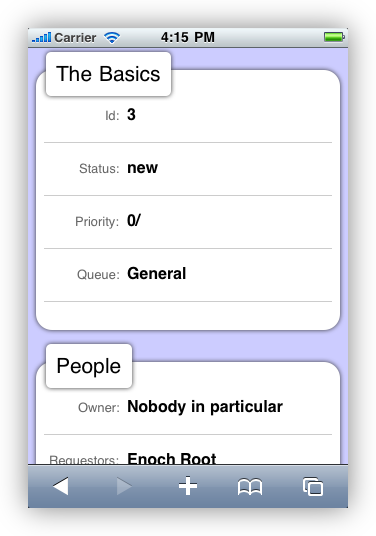
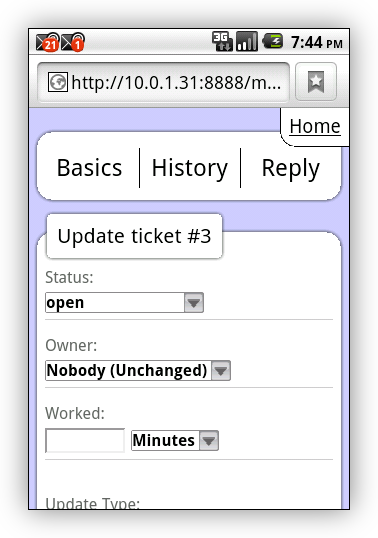
A few months ago, we wrote RT::Extension::MobileUI to give RT a mobile interface. We liked it so much that we quickly integrated it into RT 4.0, fixing some bugs along the way.
If you've already installed the extension, you should disable and uninstall it before upgrading to RT 4.0. When you do upgrade to 4.0, it'll already be there ready for you.
For more information, see our original blog post about the mobile UI.
When your customers, clients, or the general public use your RT, brandingit to match the rest of your web sites can be important. RT 4 makes it easier than ever to rebrand RT to suit your needs. You can upload your own logo, set page colors from your logo or a color wheel, and customize CSS on the fly.
Navigate to Configuration → Tools → Theme as a superuser (such as root) and you'll see:
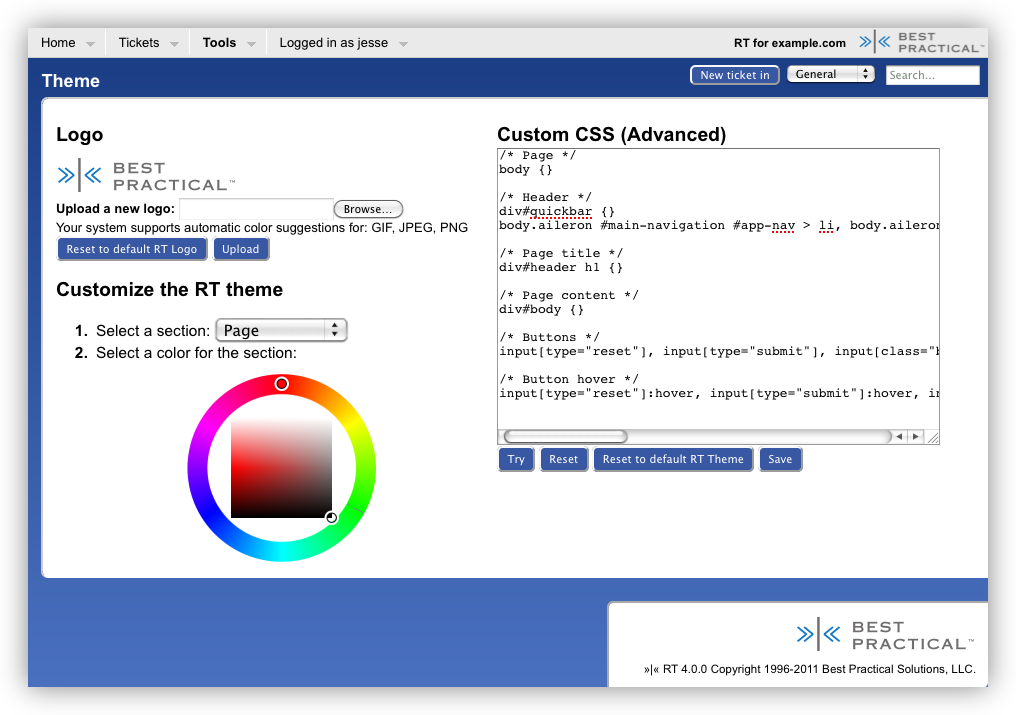
From here you can upload a logo and pick colors for the various page sections. RT will automatically pick out the six most frequent primary colors from your logo and offer them as options next to the color wheel. In less than a minute, you can upload a logo and set a few colors:
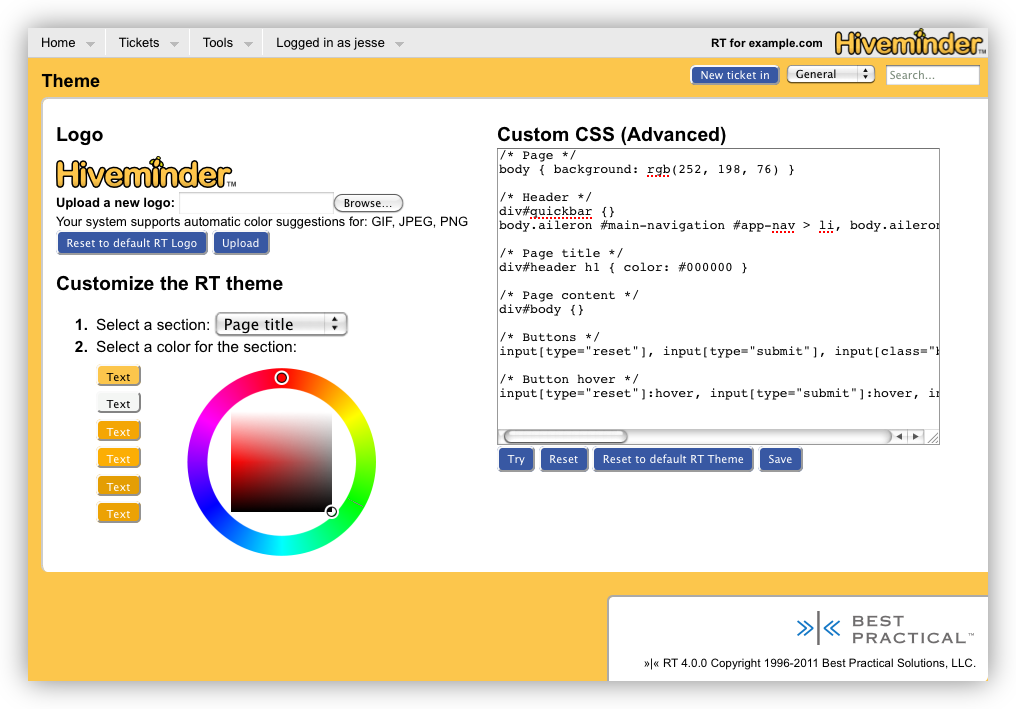
After trying out your color scheme, be sure to click Save to make it stick. If you ever want to wipe the slate clean, just use one (or both!) of the "Reset to default" buttons.
The theme editor lets you do a bit more if you know your way around CSS or have a web designer who does. By writing your own styles in the Custom CSS box, you can quickly customize the RT look and feel pretty extensively:
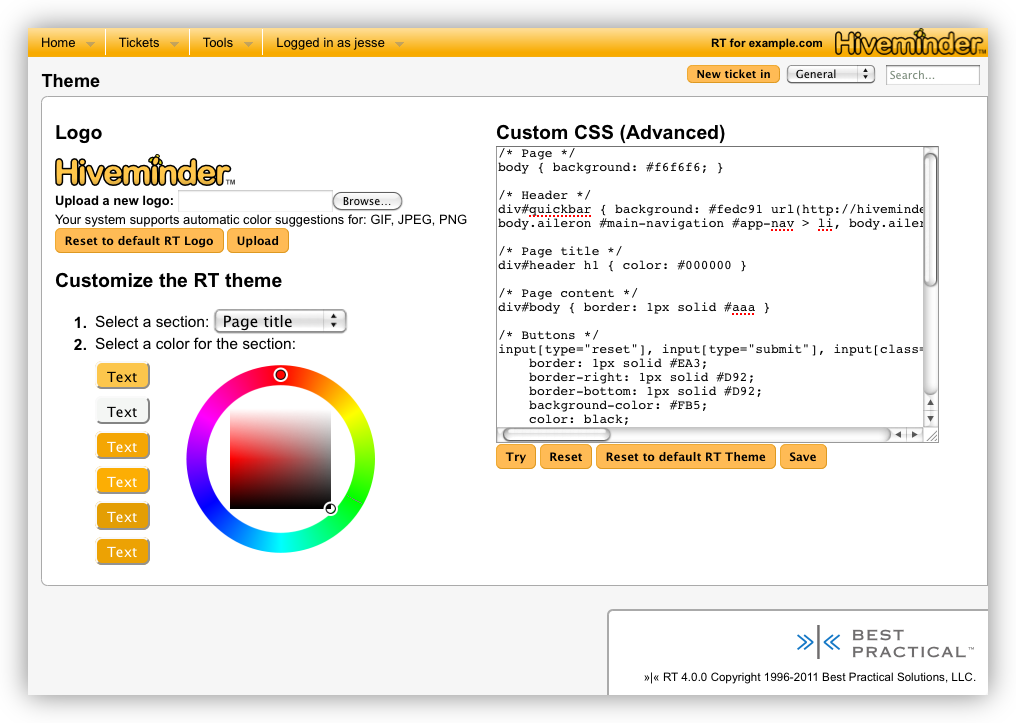
After making CSS changes click Try to see how they look, and when you're done be sure to Save.
We hope the new theme editor lets you integrate RT even better into the rest of your services.
Over the coming weeks, we'll be highlighting some of the most excitingnew features in RT4 in a series of blog posts. You can find a list of what we have planned at the end of this post.
To kick it off, let's look at the first change you'll see when you start up RT 4, the new default Aileron theme:
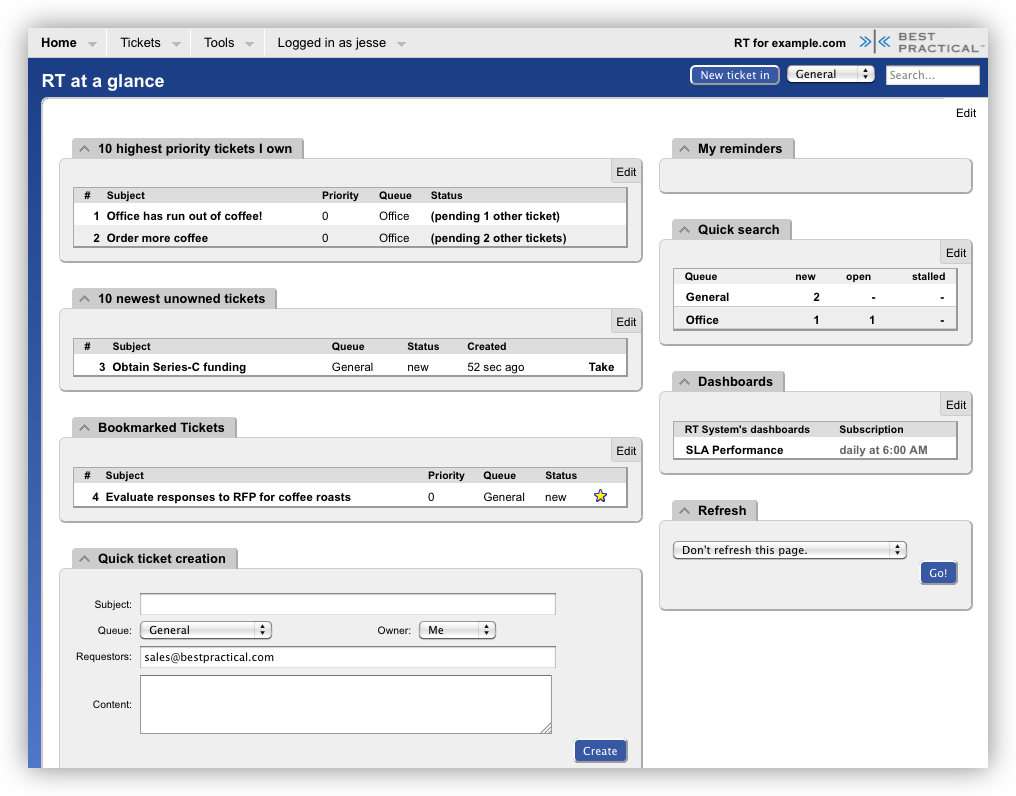
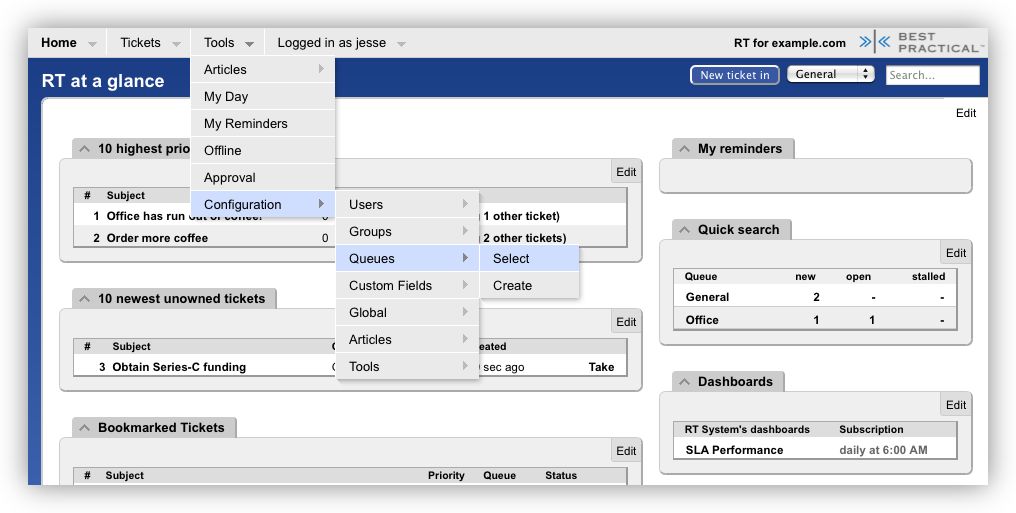
Aileron uses less screen space and lets RT take up the whole width of your browser. You'll find RT's menus at the top of the page. The extra space for ticket results and dashboards make RT a lot easier to use on smaller screens. The new menus are more compact, but let you dig deeper into RT before than before with many fewer clicks and page loads. You can now find your dashboards in the Home menu from any page with just a single click.
When you need to add or update users, groups, queues, or just about anything else, it's a lot easier to get exactly where you want to go the first time:
Menus aren't the only bit of UI we've improved. The ticket create and update pages now sport a a nifty new two column layout that puts content front and center. Metadata like owner, status, update type and custom fields appear to the right.
To make it easier to notice whether you're writing back to a requestor, the message box itself turns light red for replies and stays white for private comments. We found that made it a lot easier to catch cases when we meant to send something to customers but instead added a private comment. It even helped us catch a couple cases where we almost sent private comments to customers.
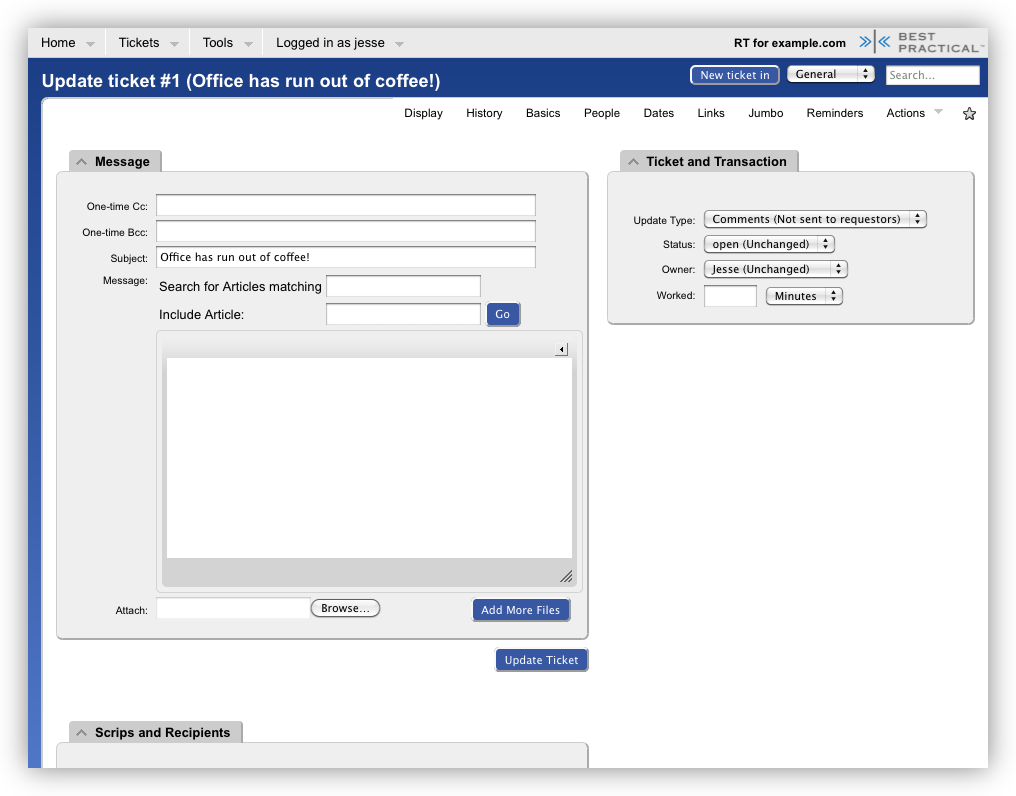
If the browser window is too narrow, the two columns will automatically collapse to one. If you'd rather always use the one-column layout, there's a new preference you can set to have RT keep them that way no matter how wide your browser is.
We're highlighting some of our favorite new features of RT 4 in a series of blog posts over the next few weeks titled What's New in 4. Each post will focus on a new feature, showing you where to find it, how to use it and how to configure it. The following posts are currently on deck; We're hoping to push out two or three of them per week.
If you want to keep up to date with what's new in RT, subscribe to the feed in your favorite feed reader.