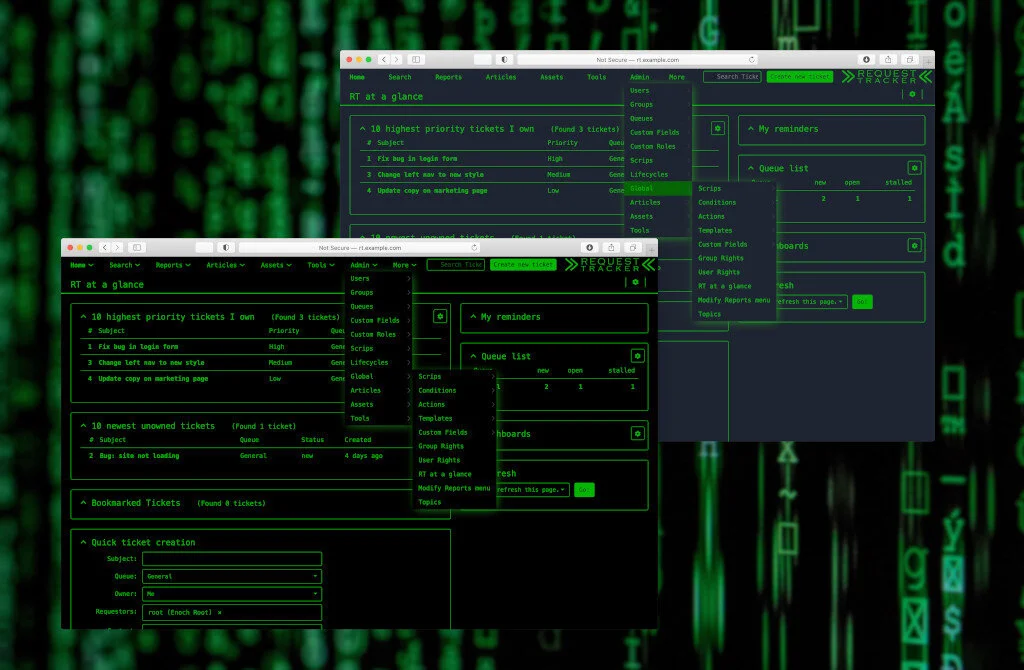
Background photo by Markus Spiske from Pexels
Retro Chic
Now that RT 5 has been released, you can have yourself a brand new RT.
So of course, the first thing to do with it is obviously to make it look old—really old.
It's just a simple fact that some of us have made a few more trips around the sun than others. And if any of you are a grizzled old veteran like me, you'll know that there's just something nostalgic about the warm glow of a big CRT green-screen terminal in the wee hours of the night.
Let's make a theme together so you can call the kids in to huddle around RT and regale them with tales of simpler times. This new terminal theme is available for download, so you can follow along or just install it and enjoy.
Going Green with RT
One of the biggest strengths of RT has always been its ability to work the way you need it to. And as open source software, it has also always been possible to go even further and change or extend its behavior in even deeper ways. And way back in RT 4.0 we made it even easier to make RT look the way you want, too. The theme editor allows you to easily customize the look of your RT with a logo and colors.
But we still get questions from users with web design experience: "can we go a little (or a lot) further?" The answer, of course, is yes!
This post assumes you're using RT 5 or higher. It is designed to serve as an example and to provide a starting point for all of you aspiring RT themers. (Plus, it was just a lot of fun to create!)
Choose a Customization Method
As we discussed back with Customizing the Look of Your RT, there are a few options to get our RT looking like a green-screen terminal.
Although it is possible to make simple changes to the look and feel of RT directly through the web interface by using the Theme Editor, the recommended way to customize RT is to package your customizations through an RT Extension. Just a few of the benefits of RT Extensions include
- Ability to add or customize other files besides just the CSS (like adding supporting images or custom JavaScript, for example)
- An extension keeps your customizations safe from subsequent upgrades that might otherwise overwrite them
- Extensions can easily be enabled/disabled via configuration
- A theme extension also makes it possible for the system (or individual users, should you grant them the rights) to still switch back to any of the default themes
- Packaging as a theme allows users to select from light and dark variations, if you create both
- Extensions also makes it easy to deploy the same customizations to other instances of RT
- And if you publish your extension to CPAN, you can even share it with others in the RT community!
Let's get started with creating our theme extension.
Create a Theme Extension
If you are already familiar with RT and the files you wish to customize, you may wish to start out creating your extension straightaway. The simple example theme that we relased previously may be a good starting point.
Alternately, you can follow the steps outlined in the Writing Extensions section of the RT Documentation to create your own from scratch. Let's do that together to create our terminal-inspired theme.
$ cpanm Module::Install::RTx Dist::Zilla::MintingProfile::RTx
$ dzil setup
$ dzil new -P RTx RT-Extension-TerminalTheme
This will create a new directory for our extension, along with an initial version of several files
├── Changes
├── Makefile.PL
├── gitignore
└── lib
    └── RT
        └── Extension
            └── TerminalTheme.pm
The file lib/RT/Extension/TerminalTheme.pm defines the main RT::Extension::TerminalTheme Perl module for our extension. In this case, we don't really need to do much in Perl to customize the behavior of RT since we're just making a simple theme. In fact, we'll really only use this file to define the version of our extension and as the source from which our README documentation will be generated. We'll edit ours to be version 1.0.0 and update the placeholder documentation. Of course, if you're already familiar with perl, you'll know that you can now
$ perldoc lib/RT/Extension/TerminalTheme.pmto preview the documentation.
Create the CSS
Let's create a directory called static/css. Anything under static will be copied to $RTHOME/local/plugins/RT-Extension-TerminalTheme/static when our extension is installed. What's more, RT will load those files as if they were a part of RT itself and lived under $RTHOME/share/static.
Next we create two directories to hold the CSS files for the light and dark variants of our theme
└── static
    └── css
        ├── terminal-dark
        └── terminal-light
While you could certainly create your CSS files from scratch, it's probably easiest to start from a copy of the elevator theme that ships with RT.
$ cp -r $RTHOME/share/static/css/elevator-light/ ./static/css/terminal-light
$ cp -r $RTHOME/share/static/css/elevator-dark/ ./static/css/terminal-dark
At this point, we can start customizing our CSS.
For this terminal theme, I made changes to the following CSS files:
└── static
    └── css
        ├── terminal-dark
        │   └── main.css
        └── terminal-light
            ├── dropzone.customized.css
            ├── main.css
            ├── main-orig.css
            └── misc.css
Then I changed the colors in the RT logo after copying it from $RTHOME/share/static/images and put it here
└── static
    └── images
        └── request-tracker-logo.svg
Whereas the CSS files we created under terminal-dark and terminal-light are all additive (they aren't part of the default RT system), RT does already have a logo image with the filename request-tracker-logo.svg. But that's ok! Because extensions can create new files _or_ override existing files. When the extension is installed, they'll all be copied to $RTHOME/local/plugins/RT-Extension-TerminalTheme/static and RT will now treat our new logo as if it were the built-in one it already knew about. And we don't have to worry about the next RT upgrade clobbering our changes, either! Pretty neat trick!
Don't forget the JS
In addition to the CSS, there are also a few JavaScript files we need to add to make sure the menus work correctly with our theme. We can just copy the defaults over from the ones that ship with RT again. Note that we create these under the html directory which, similarly to above, will get installed to $RTHOME/local/plugins/RT-Extension-TerminalTheme/html and the files will augment or override the core RT html templates. (And yes, the subdirectory is called css even though, in this case, the contents are JavaScript).
$ cp -r $RTHOME/share/html/NoAuth/css/elevator-light/ ./html/NoAuth/css/terminal-light
$ cp -r $RTHOME/share/html/NoAuth/css/elevator-dark/ ./html/NoAuth/css/terminal-dark

└── html
    └── NoAuth
        └── css
            ├── terminal-dark
            │   ├── AfterMenus
            │   ├── BeforeNav
            │   └── InHeader
            └── terminal-light
                ├── AfterMenus
                ├── BeforeNav
                └── InHeader
Deploy your Theme Extension
In order to deploy your extension, you can simply
$ perl Makefile.PL
$ make
$ make install
Finally, you will need to enable the extension in your configuration. Add this line to, for example, $RTHOME/etc/RT_SiteConfig.pm
Plugin( 'RT::Extension::TerminalTheme' );and then restart your RT webserver. If you are doing this while still developing the theme, you may also need to clear the Mason cache
$ rm -rf $RTHOME/var/mason_data/objor use the $DevelMode configuration setting.
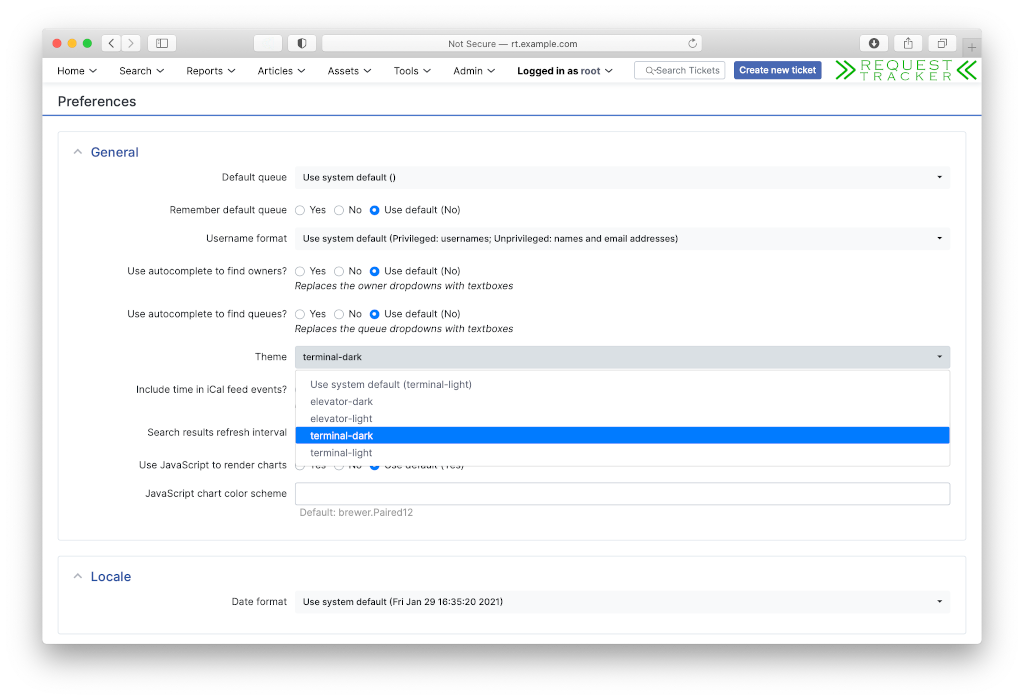
If you now go to Logged in as > Settings > Preferences, you will see your new themes available as options.
You can also see that the RT logo has been overridden so we know our extension worked!
Optionally, you can also make either the light or dark variant the system-wide default theme by adding
Set( $WebDefaultStylesheet, 'terminal-dark' );to your configuration.
That's it! You can now enjoy RT like an old-timer!
Dark theme
Light theme
Learn More
If you're ready to give it a try, we have lots of additional documentation to help get you started. We also offer training sessions if you are looking to take a deeper dive and really start unlocking the power of RT.
And of course, we would love to see a bunch of new themes and designs pop up on CPAN, so let us know if you create and release your own theme extension!


